Customizing a Data Dictionary for the Customer Table
In this section you will customize the cCustomerDataDictionary that was automatically created when you created the table. You will add some business rules and other settings to the Data Dictionary. The reason for each Data Dictionary setting you apply will be explained.
Important
This section assumes that you have completed the Creating the Database section of the Creating a Complete Order Entry System book. You cannot complete this section without first creating the required workspace and database. If you have not done so, switch to Creating the Database now and return here when you have completed that step.
Data Dictionary Classes and Objects
DataFlex is an object-oriented language. When you create a Data Dictionary for a particular table, it creates a DataDictionary class from that definition. When you create a component (for example, a view or report) in the Studio that uses a table, the Studio creates a Data Dictionary Object (DDO) in that component based on a DataDictionary class.
For example, you will create a class for the Customer table named cCustomerDataDictionary. The Studio will create an object named oCustomer_DD based on this class if you create a component that uses this Data Dictionary class for the Customer table.
You can create multiple DataDictionary classes with varying business rules for any given table, or even multiple layers of classes that inherit from the top class down. This sample focuses on a single DataDictionary class for the Customer table.
To see how to create multiple Data Dictionaries for a single database table and use those in the Studio, see Creating Data Dictionaries in the Creating Database Application Components book.
The Table Explorer is the main access point in the Studio for database tables and Data Dictionaries.
Table Explorer
The Table Explorer is a docking window that lists the current project and components included in the current project by type. Read more about this in the Table Explorer topic in the Studio book. By default, this panel is located on the left side of the Studio, as a tab in the same window group as Code Explorer.
You can familiarize yourself with Table Explorer in more detail in the Creating Tables page of the Creating Database Application Components tutorial book. You can also learn more about Table Explorer in the Table Explorer topic in the Studio book.
Steps:
- Open the
OrderTutorialworkspace in DataFlex Studio.
Important
To complete the pages in this tutorial section, you must have at least one Windows application in theOrderTutorialworkspace. Create a Windows application namedOrder.src. For a refresher on creating Windows applications, complete the Creating a Windows Application and Compiling and Running a Windows Application pages, then return here.
-
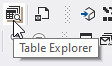
Take a look at the Table Explorer window. If Table Explorer is not open, click the Table Explorer button on the Studio's toolbar.
-
In Table Explorer, expand the
Customertable (created in the Creating the Customer Table step) to display its Columns, Indexes, Relationships and Data Dictionaries. You will seecCustomerDataDictionarylisted.
Note the check mark in the Data Dictionary icon. The check mark indicates that this is the Default Data Dictionary for this table.
If you skipped the Creating the Database section of the tutorial and just copied the Data folder from the Order Entry sample workspace to the OrderTutorial workspace, you will not see cCustomerDataDictionary listed. Follow steps 4 and 5 to create the Customer table data dictionary. If you do see cCustomerDataDictionary, continue to step 6.
-
If
cCustomerDataDictionaryis not present, select Create New Data Dictionary... from the Table Explorer context menu. If you have the Customer table selected while doing so, the Create New Data Dictionary Class dialog will open with the proper table preselected. -
The Create New Data Dictionary Class dialog opens. If the Customer table is not selected, select it now from the Table combo box. Leave the default DD Superclass (
DataDictionary).
The list of DD superclasses could contain any number of custom DataDictionary subclasses you wish to use for your projects. For example, you could use a DataDictionary subclass from a library workspace that contains business logic to be inherited by all Data Dictionaries across your company's workspaces and projects.
When you press Tab to navigate into the DD Class Name form, the name cCustomerDataDictionary and the file name cCustomerDataDictionary.dd will be defaulted for you. Accept these defaults and click OK.
- Double-click the
cCustomerDataDictionaryclass. The class will open in the Studio's Data Dictionary Designer.
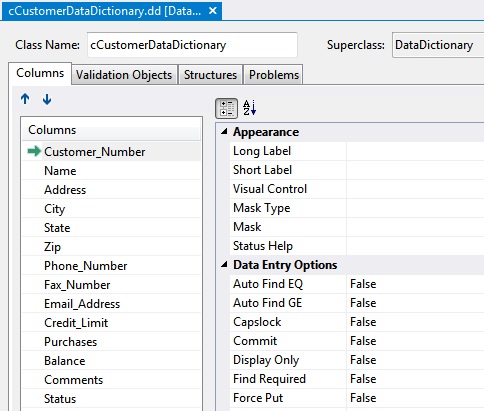
As with visually modeled source code files such as views and report views, an additional window showing the source code for this Data Dictionary class has opened, in addition to the Designer.
Tip: You can press F7 to toggle between the two different views (code editor and designer) of the current file. If only one of the views is open when you press F7, the other view will automatically be opened and added as a new tab page.
- On the Data Dictionary Designer's Columns tab page, select the
Customer_Numbercolumn and set theAuto Find EQoption (in the Data Entry Options group) toTrue.
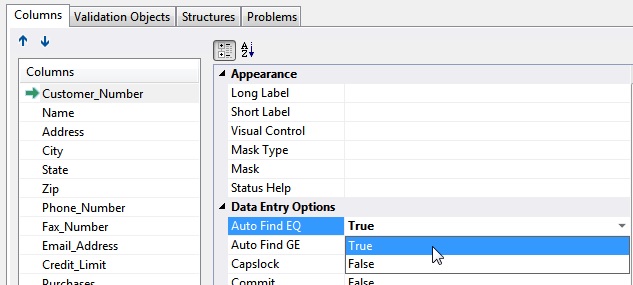
Auto Find EQ performs a find and, if a record is found whose value in the main index exactly matches, it is displayed to the screen.
- For the
Customer_Numbercolumn, set theProtect Value (Key)option (Data Entry Options) toTrue.
You may define a single primary key for any table. Although there can be only one primary key, it can consist of multiple columns. Such a key is defined by setting the key_field_states of all of its columns to True. In this case, the primary key consists of just the Customer.Customer_Number column.
- For the
Customer_Numbercolumn, set theNo Putoption (Data Entry Options) toTrue.
No Put means users can enter data into the connected window for finding purposes, but that data will not be put back to the record buffer or saved. No Put is used because we want the value of this column to be assigned by the system.
-
Select the
Statecolumn and set theCapslockoption (Data Entry Options) toTrue. This converts input to uppercase for display and input. -
Select the
Purchasescolumn and set theDisplay Onlyoption (Data Entry Options) toTrue.
Select theBalancecolumn and set theDisplay Onlyoption toTrue.These columns will be read-only because the Order Header Data Dictionary will be maintaining these values.
Auto Increment Columns in the Embedded Database
Auto numbering is supported in the embedded database via a counter column in a system table. To enable auto numbering, you need to create a column in a system table of the same type (always numeric) and length as the column that is to be auto numbered.
You will now assign an auto increment column to the Customer_Number column. It will be incremented from the Cust_Number column in the DFLastID table.
This enforces business rule #8, which states that unique numbers must be created automatically for new orders, customers and vendors. The same technique will be used for orders and vendors.
-
Select the
Customer_Numbercolumn, then select theAuto Incrementoption (Other group). Click the prompt button (...) in the Auto Increment option form. This opens the Select Auto Increment Table and Column dialog.
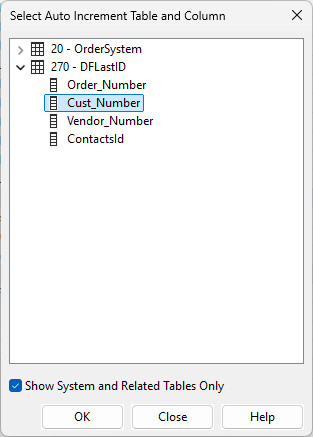
Expand the
DFLastIDtable and select theCust_Numbercolumn, then click OK.
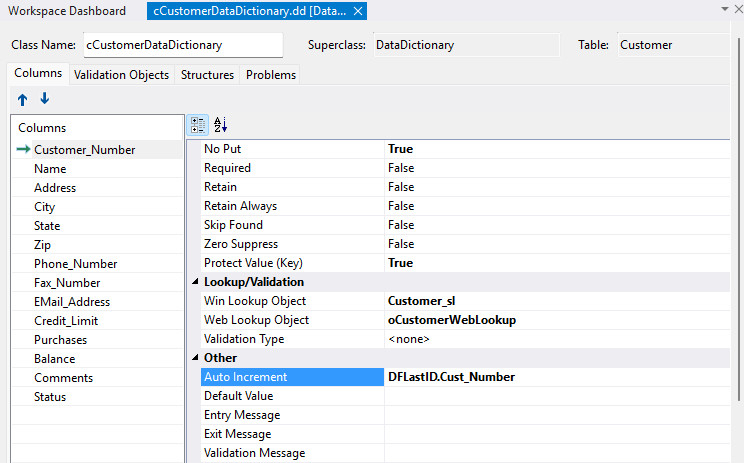
The Data Dictionary will perform auto numbering of Customer.Customer_Number automatically when a new Customer record is saved.
Masks and Appearance
The Mask Type and Mask options (Appearance group on the Columns tab) let you set up data-entry masks for each column. Masks can be used to restrict data entry to a defined pattern of numbers, letters, and punctuation marks, or to provide formatted displays of column values. Masks are used for display and input only; the data is saved to the database without masking characters.
-
Select the
Zipcolumn and set theMaskoption (Appearance group) to#####-####.This means users can only type numeric digits; a dash will be inserted after the fifth digit. Any other data entered will be ignored.
-
Select the
Credit_Limitcolumn and set theMask Type(Appearance group) toMask_Currency_Window.Do the same for the
PurchasesandBalancecolumns.The
PurchasesandBalancevalues are maintained by the Order Header Data Dictionary. Changes in order totals should automatically adjust these balances. You want to display these values with proper currency formatting while preventing direct user entry. A currency sign will precede the data, with thousands delimiters and two decimal places. The currency symbol, delimiters, and decimal point follow the Windows regional settings.For ease of data entry, mask characters disappear while the column is being edited. See Field_Mask and Default_Currency_Symbol for creating masks that use the Windows user's regional settings.
Visual Controls
The Visual Control option (Appearance group on the Columns tab) specifies the type of visual control the Studio will use in Windows application components when you drag the column onto a view. By leaving this option blank, the Studio uses the control defined in the Configure Workspace dialog on the Class Preferences tab page.
-
Select the
Statecolumn and set theVisual Controloption toCombo. This selects the Windows or Web class defined for the Combo entry in the Configure Workspace dialog, depending on whether you are designing a Windows or Web component (e.g.,dbVieworcWebView). -
Select the
Credit_Limitcolumn and set theVisual Controloption toSpin.
Labels
You may set long and short labels that will be applied to a column. A long label is used when creating form-based controls; a short label is used for list- or grid-type controls. If a short label is not defined, the Studio uses the long label; if that is also blank, the Studio uses an intelligently converted column name.
-
Set long and short labels for columns as follows (Appearance group):
-
Customer_Number: Long Label = Customer Number; Short Label = Number Name: Long Label = Customer Name; Short Label = NameAddress: Long Label = Street Address; Short Label = AddressState: Long Label = State; Short Label = St.Zip: Long Label = Zip/Postal Code; Short Label = ZipPhone_Number: Long Label = Phone Number; Short Label = PhoneFax_Number: Long Label = Fax Number; Short Label = FaxEmail_Address: Long Label = E-Mail Address; Short Label = E-MailPurchases: Long Label = Total Purchases; Short Label = PurchasesBalance: Long Label = Balance Due; Short Label = Balance
Status Help
Status help messages are short messages displayed on the status line when users enter named columns. Windows conventions expect them, and it's recommended to provide them.
-
Set the
Status Help(Appearance group) for these columns: -
Customer_Number: Customer ID Number (system assigned) Name: Customer/Company NameAddress: Street AddressCity: City NameState: Two letter state IdZip: Zip or Postal CodePhone_Number: Telephone NumberFax_Number: Fax Phone NumberEmail_Address: E-Mail AddressStatus: Active/Inactive Status of Customer
Lookup Object
The Lookup Object option allows you to connect columns to a lookup list object used to search the table. The Lookup Wizard normally maintains this value. You can create lookup lists manually and then select the appropriate lookup list object from the prompt in the Lookup Object option.
Validation Type
The Validation Type option configures simple validation types. You will configure the Status column to be a checkbox column with options Y and N, stored in the database as True or False respectively.
-
Select the
Statuscolumn, then choose theValidation Typeoption (Lookup/Validation group). Click the prompt button (...) to open the Column Validation dialog.
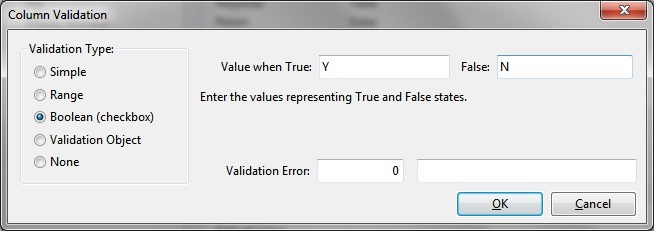
Select the Boolean (checkbox) radio option. Enter
Yin the "Value when True" form andNin the "Value when False" form, then click OK.Back on the Columns tab page of the Data Dictionary Designer you will see
Y, Nshown as the Validation Type.

Validation Object (Validation Tables)
The Validation Object tab page in the Data Dictionary Designer allows you to set up tables of valid column entries. Validation tables are attached to one or more columns and can be used to validate entered data or to provide suggested values.
There are three types of validation tables:
ValidationTable— static dataDescriptionValidationTable— static data with descriptionsCodeValidationTable— dynamic data from tables
You can read more conceptual information in Using Validation Tables. By default, all these tables are used for column validation. If a value in the column is not a member of the validation table's list, the column will be considered invalid. If validation is not required, set the table's Validate_State property to False.
This Data Dictionary will use a CodeValidationTable and point to records in the CodeMast table.
-
Click the Validation Object tab. Click the Add Validation Object toolbar button.
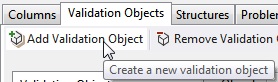
-
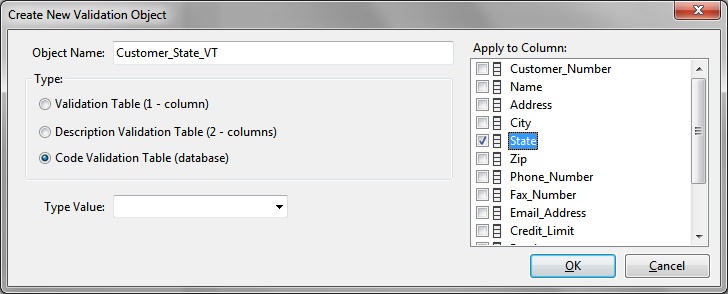
In the Create New Validation Object dialog:
-
Leave the Type Value combo box blank (you will populate it next).
- Type
Customer_State_VTas the Object Name. - Select Code Validation Table (database) as the Type.
- Make sure the
Statecolumn is checked in the Apply to Column list. - Click OK.
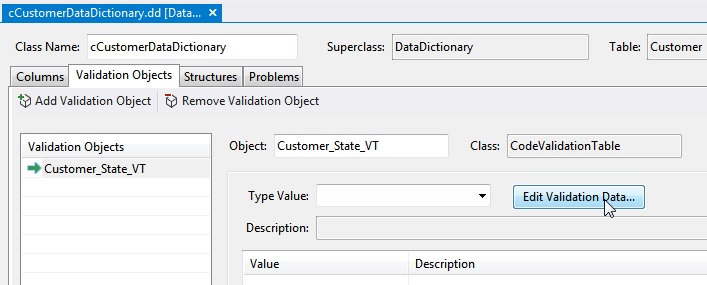
This creates the validation object but it is not yet populated with data.
-
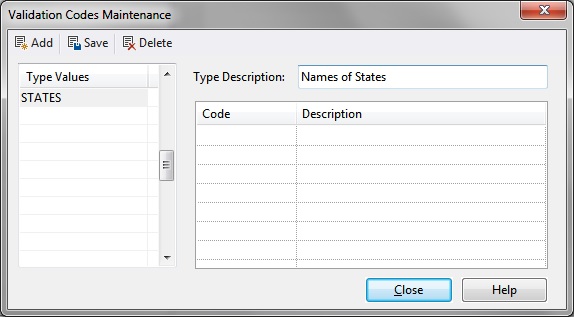
Click Edit Validation Data... to open the Validation Codes Maintenance dialog.
-
In the Validation Codes Maintenance dialog:
-
Type
STATESinto the selected row in the Type Values grid. - Click in the Type Description form and type
Names of States. - Press
Tabto get into the grid below and add Value and Description pairs for the validation table. The code for each state should be its two-letter capitalized abbreviation and the Description the full state name (e.g.,FL—Florida).
Shortcut Tip: If you prefer to skip entering all states manually, you can copy CodeMast.* and CodeType.* from the Data folder in the Order Entry sample workspace into the OrderTutorial workspace's Data folder (ensure neither workspace is open in the Studio when copying and back up the OrderTutorial workspace first). The CodeMast and CodeType tables in the Order Entry workspace already contain this data. If you take this shortcut, skip ahead to step 24 and select STATES from the Type Values combo box for the Customer_State_VT validation table.
Here is the full list of states to enter:
| Code | State |
|---|---|
| AK | Alaska |
| IL | Illinois |
| NC | North Carolina |
| SC | South Carolina |
| AL | Alabama |
| IN | Indiana |
| ND | North Dakota |
| SD | South Dakota |
| AR | Arkansas |
| KS | Kansas |
| NE | Nebraska |
| TN | Tennessee |
| AZ | Arizona |
| KY | Kentucky |
| NH | New Hampshire |
| TX | Texas |
| CA | California |
| LA | Louisiana |
| NJ | New Jersey |
| UT | Utah |
| CO | Colorado |
| MA | Massachusetts |
| NM | New Mexico |
| VA | Virginia |
| CT | Connecticut |
| MD | Maryland |
| NV | Nevada |
| WA | Washington |
| DE | Delaware |
| ME | Maine |
| NY | New York |
| WI | Wisconsin |
| FL | Florida |
| MI | Michigan |
| OH | Ohio |
| WV | West Virginia |
| GA | Georgia |
| MN | Minnesota |
| OK | Oklahoma |
| WY | Wyoming |
| HI | Hawaii |
| MO | Missouri |
| OR | Oregon |
| IA | Iowa |
| MS | Mississippi |
| PA | Pennsylvania |
| ID | Idaho |
| MT | Montana |
| RI | Rhode Island |
Once you have finished entering all states, click Close.
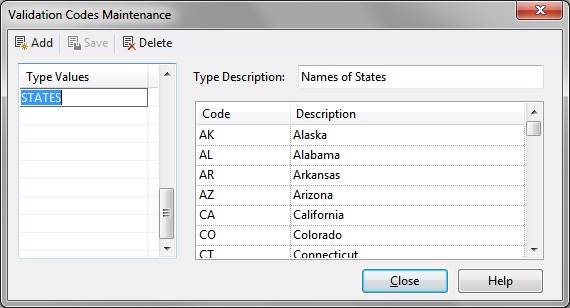
This returns you to the Validation Objects tab page with Customer_State_VT now populated.
- If the Code Explorer window is not open, click the Code Explorer toolbar button.

Notice that the Customer_State_VT object has been added to the Data Dictionary source code file (cCustomerDataDictionary.dd) and is listed in Code Explorer. Select Customer_State_VT in Code Explorer.
- Click the Properties toolbar button to open the Properties window.

In the Properties window you can now see and change properties for the newly created validation table object.
- Set the
Allow_Blank_Stateproperty toTrue. This specifies that a blank entry is valid.
Default Values
Setting a default value for a column will apply the default when a view or web form is cleared to start a new record.
- If you wish, select the
Statecolumn and set theDefault Valueoption (Other group) to the desired two-letter abbreviation.
You can also enter other default values for other columns — for example, 1000 for Credit_Limit and Y for Status.
Structure Tab (Required and External Tables)
Click the Structure tab page of the Data Dictionary Designer. This section defines the database structure for the table you are editing. You must identify all related parent tables, all related child tables, and all non-related external tables (like system tables). It is crucial to identify these tables properly because the Studio uses this information to build and connect Data Dictionary Object (DDO) structures in your components and to enforce validity checks and locks at runtime.
In most cases, the Studio will fill these lists automatically based on relationships in the database table. If you defined an auto increment column from an external table (as with DFLastID.Cust_Number), that external table is added to the Externally Updated Tables list and an appropriate Lock Mode is selected.
Lock Mode
The lock mode determines under what conditions a table should be locked. The Studio handles this for required parent and child tables, but you can choose how to lock externally updated tables. Typically, for system tables used only for auto incrementing columns, the lock mode is DD_Lock_On_New_Save. This means the DFLastID table will only be locked when a new record is saved, improving efficiency in multi-user environments.
DataFlex locks all open lockable tables (DF_FILE_MODE attribute set to DF_FILEMODE_DEFAULT), but Data Dictionaries use a technique to only lock the tables involved in the current update, delete, or create operation.
You might need to modify these lists if you:
- Modify table relationships for a Data Dictionary's main table after creating the Data Dictionary. If the parent and child tables exist and their relationships are already established in the database, click the Rebuild toolbar button to automatically populate the lists.
- Add source code that accesses tables not already in the required child or parent lists during update, delete, or create operations.
Foreign Field Options
At the bottom of the Structure tab page are three groups of Foreign Field Options. These settings apply to foreign columns — columns that belong to a parent table relative to the server DDO for a control. Foreign field properties are added to any column properties already applied directly to the column.
Three special type designators assign foreign field options to all columns of a specified type:
- Key columns (primary indexed column of a table)
- Indexed columns (other indexed columns)
- Default columns (non-indexed)
For example, if a parent column is an indexed column that has Auto Find EQ set to True in the parent Data Dictionary, the indexed foreign field options (by default No Put) are added; the column would therefore have both Auto Find EQ and No Put.
-
Verify the foreign field options:
-
Key Foreign Field Options: ensure
Find Requiredis checked (and nothing else).Find Requiredensures a record in the ancestor table must be found before entry can continue. - Indexed Foreign Field Options: ensure
No Putis checked.No Puton foreign index columns allows entry for finding but does not save to ancestor tables. - Default Foreign Field Options: ensure
Display Onlyis checked.Display Onlyprevents data entry into connected windows and ancestor tables. The Data Dictionary structure will update ancestor tables when necessary.
Because the only key column is Customer_Number, the complete option set for Customer_Number becomes Auto Find, No Put, and Find Required.
Cascade Delete and Business Rule Enforcement
Business Rule #1 states that if a customer is associated with an order, you cannot delete the customer. Two tables are involved: the Customer parent table and the Order Header child table. Restated in DataFlex terms: if one or more child-table (OrderHea) records relate to a parent-table (Customer) record, do not allow deletion of the parent record.
If you do not turn off cascade deletes, deleting a customer record will also delete descendant records (all orders belonging to that customer and all order lines belonging to each order). Our business rule requires that deletion be disallowed if child records exist. After turning off cascade deletes, if users try to delete a customer record that has related child records in the Order Header table, they will see an appropriate error message.
-
If the Code Explorer window is not open, click the Code Explorer toolbar button.
You may have to click on a focusable window in the Data Dictionary Designer (for example, the Class Name form) for Code Explorer to populate.
-
Select the
cCustomerDataDictionaryclass in Code Explorer. -
Click the Properties toolbar button to open the Properties window.
In the Properties window you can now see and change properties for the
cCustomerDataDictionaryclass. -
Set the
Cascade_Delete_Stateproperty toFalse. -
Click the Save File toolbar button (or press
Ctrl+S) to save the Data Dictionary.
At this stage, you may want to view the source code for cCustomerDataDictionary in the Code Editor to review the changes. Press F7 to switch to the source code view of your DD class. Without entering a single line of code, you have a fully functional Data Dictionary for the Customer table. It contains details of column options and defaults, status help, prompt lists, check values, masks, and so on — applied every time the table is accessed by any program component using this Data Dictionary class.
The Data Dictionary also knows about required child and system tables and will enforce two of our business rules: auto-incrementing numbers for new customers, and preventing deletion of customers that have order history. It also contains defaults that the Studio will use when creating data-aware objects from this table in your application components.
You may want to compare this new Data Dictionary class with the one distributed with the DataFlex Order Entry sample workspace. If you followed all instructions, the two .dd files should be identical. Use a file comparison tool or open each workspace (the completed Order Entry sample workspace and the OrderTutorial workspace) in separate Studio instances and compare them side-by-side.