Creating the Database
In this section, you are going to recreate the database for the Order Entry sample application.
In the process, you will learn how to:
- Create tables and edit table schemas
- Create a complete relational structure of tables for the Order Entry application
Skipping this Section
If you wish to skip this section of the tutorial, the manual creation of tables, you may instead copy the Data folder from the Order Entry sample workspace to the OrderTutorial workspace. Make sure neither the OrderTutorial nor Order Entry workspaces are open in the Studio when copying the Data folder, and that you have backed up the OrderTutorial workspace, just in case.
Taking this action will provide you with the complete database for this tutorial, including sample data.
Overview
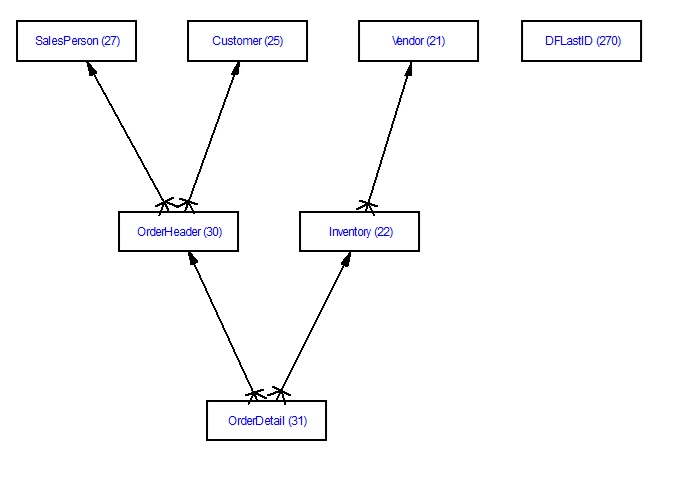
The following is a schematic of the tables we will be using and their relationships to each other. The arrows signify that the data in a column in the lower table (the child) is the same as the data in a unique column in the higher table (the parent). This allows the relationship of many child records to one parent record, increasing table integrity and consistency, and reducing the amount of data entry necessary. Once you have defined a relationship, DataFlex handles the maintenance of it automatically. The numbers in parentheses are filelist slot numbers (not important for most things).
Before Creating the Tables, Columns, and Indexes
Here is some information you should know before you start building the tables:
The order in which tables are created is important because you cannot add relationships from one table to another table that does not exist. This is especially true in a database structure that has a relatively complex hierarchy. It is helpful to create system tables first, then parent tables, and finally child tables.
In the Order Entry database structure, there is one table at the base of the hierarchy. This table, the Order Detail table, has no children of its own; therefore, it is considered the "childmost" table in the hierarchy. By contrast, you have three tables that are at the top of the hierarchy. These tables (Customer, Salesperson, and Vendors) have no parents of their own (i.e., they do not relate to any tables); therefore, they are considered the "parentmost" tables in the hierarchy. There is one other table, a "system" table, which is a special type of table that has only one record and no indexes. It is used to hold the next-available order, customer, and vendor numbers.
In the context of a family tree (with the child being at the base), the child is Order Detail, while Order Header and Inventory are the parents of the child. The Customer, Salesperson, and Vendors are the grandparents of the child.
Note: As you can see, parent tables can have parents of their own, and child tables can have children of their own. While child and parent refer to the proximate generations, the terms "descendant" and "ancestor" are used to refer to tables removed from the reference table by any number of generations.
First, you will create the Order Entry System table. Since Customer, Salesperson, and Vendors do not relate to any other tables, you will create them next. Finally, you will create the Order Header, Inventory, and Order Detail tables. The order in which you create tables that are at the same level of the hierarchy is not important. For this example, we will create the tables from left to right, as they appear in the chart at the beginning of this section.
The specifications for the tables, columns, and indexes are shown in the next several pages. For consistency of screenshots and to allow for copying of completed tables, we have used the same table numbers as those in the finished sample workspace. You could, in fact, use any table numbers you like (1-4096 with 48-50 and 250-300 reserved), but we suggest you use the ones shown for the purposes of this tutorial.
Note: You can use the Order Entry sample workspace to compare and debug your code. Run the Order Entry samples; adding a few orders and examining this sample will give you a better understanding of the manual code added during the tutorial.
This tutorial section will take you through the following steps: