Creating the Customer Table
You will now create the Customer Table for the Order Entry sample application.
DataFlex Databases
A database in DataFlex is basically a collection of tables (in any supported database format) and a file named filelist.cfg (typically just called the filelist) that combines the tables into a collection. The filelist assigns a number and name to each table, in addition to a reference to the physical table name. Each DataFlex application requires a filelist to access database tables. When you create a DataFlex workspace, the workspace is created with a Data folder that already contains a filelist, as well as two support tables (CodeMast and CodeType).
Creating a table means creating a table in the chosen database and creating an entry for it in the filelist.
Steps to Create the Customer Table
- Click the Create New Table button on the Table Explorer toolbar.
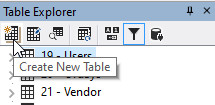
In the Create New Table dialog, type Customer as the Table Name and click OK.
The Studio defaults to automatically creating a Primary Key and Auto Increment Table.

The new table will open in the Table Editor.
- Click on the Add Column toolbar button in the Table Editor to add a new column.

- Type
Customer_Numberas the Name of the first column to add and press the Tab key to move to the Type column. Choose Numeric as the column type from the combo box (you can just typeNto do so) and press Tab; make the length6.0and press Tab twice to move to the next row. This completes the definition of theCustomer_Numbercolumn.
The Customer_Number column will be an auto-increment column, so its value will always be unique. Defining this column as an auto-increment column is a Data Dictionary-based business rule that will be explained in Creating a Data Dictionary for the Customer Table.
- Continue to add columns to the table until your column definitions look like those in the image below.

Next, you will add indexes for this table.
- Click on the Add Index toolbar button on the Index tab to add a new index.

- Enter the Segments grid and select
Customer_Numberas the column to add as the first index segment from the combo box. This is the only segment for the first index, meaning that we will never be allowed to have two customers with the same number. This is what we want.
The completed index should look like this:

- Click on the Add Index toolbar button to add index 2. The segments of this index will be
NameandCustomer_Number.
Check the Ignore Case checkbox for Name. Checking this checkbox means that searching on that column will be case insensitive.
The column value in the index is stored in its uppercased value. Checking Descending for an index segment means that searching starts at the end of the index and works backwards.
The completed index should look like this:
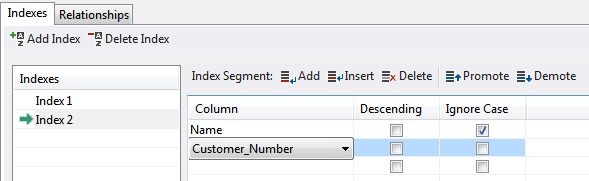
- Click on the Add Index toolbar button to add index 3. The segments of this index will be
BalanceandCustomer_Number.
The completed index should look like this:
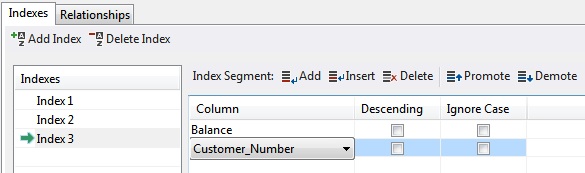
- Click the Save File toolbar button (or press Ctrl + S) to save the table schema.
The Output window will display the results of the save operation.
-
Take a look at the Table Explorer again. Expand the Customer table to display its Columns, Indexes, Relationships, and Data Dictionaries. Expand the Data Dictionaries node.
Note that a Data Dictionary class named
cCustomerDataDictionaryin a file namedcCustomerDataDictionary.ddis automatically created when you create a new table (when you save the table the first time). Since you need a Data Dictionary for any table for which you wish to create components (e.g., Views, Web Objects), one is created for you automatically when creating a table.This Data Dictionary class is a subclass of the standard DataDictionary class that is part of the DataFlex Class library.
You will learn how to customize Data Dictionaries for the Order Entry system tables in the next section, Customizing the Data Dictionaries.