Customizing a Data Dictionary for the Order Header Table
In this section, you will customize the cOrderHeaderDataDictionary that was automatically created when you created the table. You will add some business rules and other settings to the Data Dictionary. The reason for each Data Dictionary setting you apply will be explained.
The exceptions are business rules already explained when you created the previous Data Dictionaries in the Customizing the Data Dictionaries book. Most explanations can be read on the Customizing a Data Dictionary for the Customer Table page, since this is the first Data Dictionary created.
Steps to Customize the Data Dictionary
-
In Table Explorer, expand the
OrderHeadertable to display its Columns, Indexes, Relationships, and Data Dictionaries. You will seecOrderHeaderDataDictionarylisted. -
Double-click on the
cOrderHeaderDataDictionaryclass. The class will now open in the Studio's Data Dictionary Designer. -
Select the
Order_Numbercolumn and set theAuto Find EQandProtect Value (Key)options in theData Entry Optiongroup toTrue. -
Select the
Order_Totalcolumn and set theDisplay Onlyoption toTrue. -
Select the
Order_Numbercolumn, then select theAuto Incrementoption in theOthergroup. -
Click on the
Prompt (...)button in theAuto Incrementoption form. - This will open the
Select Auto Increment Table and Columndialog. - Expand the
DFLastIDtable and select theOrder_Numbercolumn, then clickOk. -
This satisfies the part of Business Rule # 8 that states that automatically incrementing numbers must be created for new orders.
-
For the
TermsandShip Viacolumns, we are going to use two different types of validation tables. The first one is a Description Validation Table that specifies the actual values and text to be used. -
Click on the
Validation Objecttab in the Data Dictionary Designer. Then click on theAdd Validation Objecttoolbar button. - This opens the
Create New Validation Objectdialog. - Leave the Type Value combo box blank. Currently, there are no available options to choose from anyway; you will populate the database for this purpose next.
- Type
Terms_Tableas the Object Name. SelectDescription Validation Table (2 - columns)as the Type. Make sure theTermscolumn is checked in theApply to Columnlist. ClickOk. -
This will bring you back to the Validation Objects tab page with a newly created validation table, but no database to populate the validation table from.
-
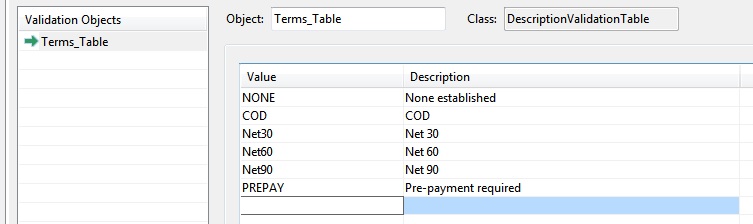
Click in the grid to add Value and Description pairs to the validation table. The list of value pairs is as follows:
-
NONE, None established COD, CODNET30, Net 30NET60, Net 60NET90, Net 90PREPAY, Pre-payment required
When completed, the Terms_Table should look like this:
- The second validation table is a
Code Validation Tablelike the one you created for theCustomer.Statecolumn.
The two different classes of table were created for sample purposes. They could both have been the same class. Item changes in a Description Validation Table require recompiling your programs. Item changes in a Code Validation Table are made to database tables (CodeMast and CodeType) and do not require recompiling. There are advantages and disadvantages to both methods. You can read more conceptual information about validation tables in Using Validation Tables.
- Click on the
Validation Objecttab in the Data Dictionary Designer. Then click on theAdd Validation Objecttoolbar button. - This opens the
Create New Validation Objectdialog. - Leave the Type Value combo box blank.
- Type
Ship_Tableas the Object Name. SelectCode Validation Table (database)as the Type. Make sure theShip_Viacolumn is checked in theApply to Columnlist. ClickOk. -
This will bring you back to the Validation Objects tab page with a newly created validation table, but no database to populate the validation table from.
-
Click on the
Edit Validation Data...button. This will open theValidation Codes Maintenancedialog. -
Type
SHIPPINGinto the selected row in the Type Values grid. Click in the Type Description form and typeShipping Methods. -
Press
Tabto navigate into the grid below to add Value and Description pairs to the validation table. The list of value pairs is as follows:FEDEX, Federal ExpressFEDEXCOD, Federal Express CODUPS, United Parcel ServiceUSINTL, USPS International MailUSMAIL, US Postal ServiceWILLCALL, Will Call
Once you have finished entering all states, click the Close button. This will bring you back to the Validation Objects tab page with the Ship_Table validation table now populated with data.
-
Select
Ship_Tablein Code Explorer. -
In the Properties window, set the
Allow_Blank_Stateproperty toTrue. -
Select the
Order_Datecolumn and set theVisual Controloption in the Appearance group todbSpinForm. -
Select the
Termscolumn and set theVisual Controloption todbComboForm. -
Select the
Ship_Viacolumn and set theVisual Controloption todbComboForm. -
Select the
Order_Datecolumn and set theMask Typeoption in the Appearance group toMask_Date_Window. -
Select the
Order_Totalcolumn and set theMask Typeoption toMask_Currency_Window. -
Select the
SalesPerson_Idcolumn and set theLong Labeloption in the Appearance group toSales Person Id. Set theShort Labeloption toSales Id. Set theStatus Helpoption toSales Person who initiated the order. -
Select the
Order_Numbercolumn and set theStatus Helpoption toOrder Number. An order number is generated automatically. -
Select the
Order_Datecolumn and set theStatus Helpoption toDate on which the order was placed. -
Select the
Termscolumn and set theStatus Helpoption toPayment terms. -
Select the
Ship_Viacolumn and set theStatus Helpoption toShipping method. -
Select the
Ordered_Bycolumn and set theStatus Helpoption toOrder placed by. -
Click on the
Structurestab page of the Data Dictionary Designer. -
For Required Parent Tables, verify that the
Commitcheckbox for theCustomertable is checked. -
Once an order is created, we want to disallow the changing of the order's customer. The changing of an order's customer does not affect integrity—all balances would be properly maintained. We have decided, however, that this type of change should not be allowed.
-
Also verify that the
Nullscheckbox for theSalesPersontable is checked. This allows the creation of Orders without an assigned sales person (such as automated sales, for example from a website, where no sales person is involved). -
Still on the
Structurestab page of the Data Dictionary Designer. -
For Key Foreign Field Options, verify that
Find Required(and nothing else) is checked. - For Indexed Foreign Field Options, just
No Putshould be checked. -
For Default Foreign Field Options, just
Display Onlyshould be checked. -
Change the
Lock Modefor theDFLastIDtable toDD_Lock_On_New_Save_Delete.
Below, in Procedure Deleting, you will create code to conditionally decrement the system-assigned order ID counter. This requires locking the system table for deletes as well as new saves. This is advanced usage of the message already seen to add a system table, and it optimizes table locking so that only creating or deleting records causes a lock.
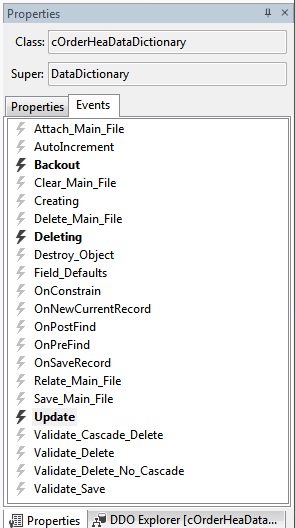
The concept of modifying a method from a superclass in a subclass or object is called augmentation. This is most often done using Events. To facilitate augmentation, the Studio provides a list of public events for all classes and objects on the Events tab in the Properties window. Read more about augmenting methods in the Language Guide.
-
For the first time, you are now going to enter some code for processing which can't be selected from checkboxes, radio buttons, and so on.
-
In the Properties window, click on the
Eventstab. - Double-click on
Backout,Deleting, andUpdate. When you have completed this process, the corresponding events will be listed in the code editor (and the Studio has switched from the Data Dictionary Designer to the code editor). - Notice in the Events tab in the Properties window that the Events you have added to your class (are being augmented) are now listed in bold.
- Add another method below the three events that were just added to the code for the
cOrderHeaderDataDictionaryclass. Type in the following code:
// Add a default date if the field is blank
Procedure Entry_Order_Date Integer iField Date dDate
    Integer iChanged
    Get Field_Changed_State iField To iChanged
    If (iChanged=0 And dDate=0) Begin
        SysDate dDate
        Set Field_Default_Value iField To dDate
    End
End_Procedure
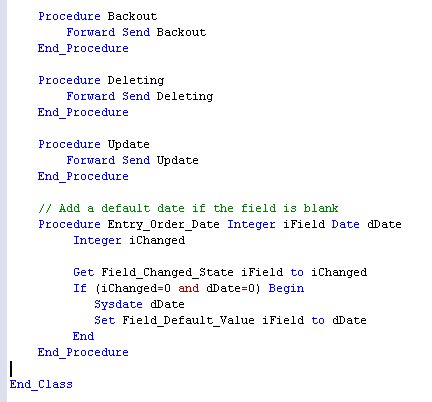
The completed code should look like this:
- Data Dictionaries can be used to define Entry, Exit, and Validation messages for table columns. These are executed during navigation into or out of a column and during data validation, respectively. You can read more about these message types in the Data Dictionary Guide in the topics Entry and Exit Methods and Field Validation Methods.
We want to assign today's date as the default for the order date. We want to assign this date when:
- A user moves into a form or item representing this column, and
- If the current date is unassigned.
We do this by creating a procedure (or function) to perform this action and then assigning this method to a column's entry message. In this case, the Entry_Order_Date method will get called anytime a data entry object (DEO) for the Order_Date column is entered. The Entry_Order_Date method demonstrates several important techniques:
- Column-entry, -exit, and -validate messages are always passed two parameters: the column number and the current column value.
- We will update the column if the current date value is 0 (blank) and the column is not changed (we want to allow users to change a date to blank). The property
Field_Changed_Stateis queried to determine if the column is changed. The passed date value is used to determine if the current date is 0. We are passed the column's date value as a parameter. We could also have acquired this value by getting theField_Current_Value. - We set the date by setting the
Field_Default_Valueproperty. This sets the column value without setting the DDO's changed state. This allows you to set defaults without causing data-loss-warning messages to be generated when a view is cleared or closed. - Setting
Field_Default_Value(orField_Current_Value) will update DEOs assigned to this table and column. This is, of course, the whole purpose of creating this method.
The Field_Changed_State and Field_Default_Value properties are accessed using the column number passed to the method. You do not need to use the column table.column syntax to access these values. In this sample, the following two lines would perform the same action. The first method, however, is faster, more flexible, and simpler.
Set Field_Default_Value iField to dDate
Set Field_Default_Value Field OrderHeader.Order_Date to dDate
-
Now you need to define when the Data Dictionary should call the
Entry_Order_Datemethod. -
Press
F7to switch back to the Data Dictionary Designer. -
On the Columns tab, select the
Order_Datecolumn and selectEntry_Order_Datefrom the combo box dropdown list in theEntry Messageoption in theOthergroup. -
The
Updatemethod is called when a record is being saved or edited, and theBackoutmethod is called when a record is being deleted or edited. They are used to maintain automatic balances in a table. This can be used to adjust balances for the table or one of its parents. In this case, we need to maintain two customer totals. Each time an order amount changes, the customer's balance due and total purchases balance must be adjusted. You can read more aboutUpdateandBackoutin the Data Dictionary Guide. -
Press
F7to switch back to the code editor. -
Add another method to the
cOrderHeaderDataDictionaryclass by adding the following code:
Procedure Adjust_Balances Number Amt
    Add Amt to Customer.Purchases
    Add Amt to Customer.Balance
End_Procedure
- Modify the
UpdateandBackoutmethods to look like the code below:
Procedure Update
    Forward Send Update
    Send Adjust_Balances OrderHeader.Order_Total
End_Procedure

Procedure Backout
    Forward Send Backout
    Send Adjust_Balances (-OrderHeader.Order_Total)
End_Procedure
The Update method is called when a record is being saved or edited, and the Backout method is called when a record is being deleted or edited. The calculations performed in these methods are opposites. They both call the Adjust_Balances method with the appropriate parameter to adjust the data as required.
- Add another method to the
cOrderHeaderDataDictionaryclass by adding the following code:
Procedure Deleting
    Forward Send Deleting
    // see if we can decrement the order number in the system file.
    // We can only do this if this is the newest order.
    If (OrderHea.Order_Number=DFLastID.Order_Number) Begin // if this is the last number,
        Decrement DFLastID.Order_Number // decrement and save.
        SaveRecord DFLastID
    End
End_Procedure
Order numbers are assigned when the order header record is created. Often a user will delete an entire order during the entry of the order's detail items. For example, the user may discover that an item is out of stock and want to stop processing the entire order. Normally the order would be deleted, but the system-assigned order number would not be rolled back. In a multi-user environment, it would not be safe to unconditionally roll back the system order number. It may not be the last order created. However, we can create a conditional rollback. If the order's number is the same as the last order number assigned, we will roll it back (decrement it).
The Deleting method is called when the table is locked and reread. If the order number of the order is the same as the system table's order number, we know we can safely decrement the system order number. This is an advanced and somewhat unorthodox use of a Data Dictionary, but it demonstrates the power and flexibility of the code-based Data Dictionary.
- Click the
Save Filetoolbar button (or pressCtrl + S) to save the Data Dictionary.