Table Viewer
Use Table Viewer to open any table in the current workspace and view and edit its data.
Opening a Table
To open a table in Table Viewer:
- Double-click the table’s icon in the Table Explorer.
- Click the View Table icon in the Table Explorer toolbar.
- Right-click and select View Table from the context menu.
Alternatively, you can select Table Viewer from the Database menu. This opens the Table Selector dialog. Use this dialog to sort the tables by table number, table name, or description. Select the table you wish to open in the Table Viewer window by double-clicking or highlighting the table and then clicking the Select button.
You can open any number of tables from your database. Only one Table Viewer window per table is supported.
Table Display
When a table is opened in the Table Viewer, the table’s columns are arranged left to right in column number order. Large binary columns are listed, but the text "" is shown in place of the actual data.
Remove Column
To remove a column from the display:
- Drag the header (caption) with the mouse until the mouse pointer is positioned outside the grid.
- Drop the column. When the mouse cursor’s shape changes into a large “X,” the column can be dropped.
Column Order
To rearrange the order of columns in the grid:
- Drag the column header left or right until the column is hovering over the desired position.
- Drop the column. When the mouse cursor changes to show two red arrows indicating the new position, you can drop the column.
Ensure that you do not move the column outside the header area of the grid; otherwise, instead of changing the column’s position, the column will be removed. If the mouse cursor is the shape of a large “X,” then the column will be removed if you drop it in that location.
Column Width
To change the width of a column, drag the divider that separates one column header (caption) from another. Use the divider to the right of the column whose width you wish to modify.
Inserting a Deleted Column
Each column you remove from the display can be re-inserted by activating the Field Chooser panel. The Field Chooser is a free-floating panel that lists all columns that have been removed from the Table Viewer window (see “Remove Column” above). By default, Table Viewer contains all of the table’s columns, and the Field Chooser is empty.
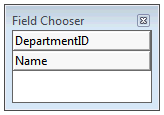
The Field Chooser is activated by clicking the Field Chooser button in the Table Viewer’s toolbar or by selecting Field Chooser from the Table Viewer context menu.
To re-insert a column:
- Drag it with the mouse out of the Field Chooser and over the grid’s header section to where you would like the column to be located.
- Drop the column. When the mouse cursor changes to show two red arrows indicating the new position, you can drop the column.
If you have multiple Table Viewer windows open at one time, it is best to close the Field Chooser panel as soon as you have finished using it. Otherwise, it can be confusing as to which Field Chooser to use for a given Table Viewer window.
Freeze Column
Normally, when the Table Viewer grid is too wide to fit in the display area, you will use the horizontal scrollbar to scroll the entire grid to the left or to the right. The “Freeze Column” feature can be used to “freeze” the leftmost x columns so that they do not scroll horizontally with the rest of the grid; they will stay in place.
To freeze one or more columns:
- Right-click in the header (caption) of the column where you want to begin freezing and select “Freeze Column” from the context menu. The column you selected and all columns to the left will remain in place whenever the grid is scrolled horizontally.
- Alternatively, you can click the “Freeze Column” toolbar button. This will freeze the currently focused column plus all columns to its left.
To “unfreeze,” repeat the same process or select “Restore Layout.”
Restoring the Layout
Any changes you have made by freezing columns, changing the width or position, or by removing columns can be restored by selecting “Restore Layout.” Either click the Restore Layout toolbar button or select Restore Layout from the context menu.
Sorting Data
Initially, the data is sorted using the table’s first index (Index #1). You can change the sort order by clicking in the header (caption) of any indexed column. The index used for sorting will be the clicked column’s “Main index” as per the table definition.
When you sort the data by clicking in a column header, the column used for sorting is shaded, and an arrow appears in the header (caption) indicating whether the data is sorted in ascending or descending order by that index.
If you click in the header of a sorted column a second time, it will toggle the sort order from ascending to descending and vice versa.
To search for a particular row, click in the data area of any indexed column and enter the indexed value you are searching for, then click the “Find LT,” “Find EQ,” or “Find GT” buttons on the toolbar to search for the entered value (or the nearest match).
Editing Data
To begin editing data, click the “Toggle Edit Data” button on the toolbar. This will set Table Viewer into editing mode. In editing mode, all columns in the grid can be selected (except for those storing binary data). Simply click or tab to the row and column you wish to modify and press enter (or start typing) to edit that column.
Once you leave the row that you have modified, the changed data will be saved. Alternatively, you can click the “Save” button in the toolbar to save immediately without having to change rows.
To delete a row, first select it, and then click the “Delete Record” button in the toolbar.
Once you have finished editing data, click on the “Toggle Edit Data” button once again, and the Table Viewer will return to read-only mode.
Be careful when editing data in Table Viewer. None of the usual data dictionary and relational database rules are applied while you are using this tool.
Navigation Buttons

First
Click the “First” button to go to the first record. The default index of the currently selected column is the index that is used to perform the search. For example, if the “Name” column is currently selected and the “Name” column is indexed (i.e., the table can be sorted by “Name”), then the first record in the table, sorted by name, will be located.
Previous
Click the “Previous” button to locate the next record. The default index of the currently selected column is the index that is used to perform the search. For example, if the “Name” column is currently selected and the “Name” column is indexed (i.e., the table can be sorted by “Name”), then the next record in the table, sorted by name, will be located.
Find
Click the Find button to locate the record matching the entered search value.
Next
Click the “Next” button to locate the next record. The default index of the currently selected column is the index that is used to perform the search. For example, if the “Name” column is currently selected and the “Name” column is indexed (i.e., the table can be sorted by “Name”), then the next record in the table, sorted by name, will be located.
Last
Click the “Last” button to go to the last record. The default index of the currently selected column is the index that is used to perform the search. For example, if the “Name” column is currently selected and the “Name” column is indexed (i.e., the table can be sorted by “Name”), then the last record in the table, sorted by name, will be located.
Edit
Click the Edit button to place Table Viewer into “Edit Mode.” See Editing Data (above) for more information. If Table Viewer is already in Edit Mode, then click the Edit button to exit Edit Mode.
Save
Click the Save button to save changes made to the current row during editing. See Editing Data (above) for more information.
Delete
Click the Delete button to delete the current row during editing. See Editing Data (above) for more information.
Refresh Data
Click the Refresh Data button to reload data into the grid. This will reflect any recent changes to the data.
Freeze Column
Click the Freeze Column button to create a vertical “freeze column section” at the currently selected column position. See Freeze Column (above) for more information.
Field Chooser
Click the Field Chooser button to activate the Field Chooser panel. Use this panel to restore columns that have been removed from Table Viewer. See Inserting a Deleted Column (above) for more information.
Restore Layout
Click the Restore Layout button to restore the default layout of columns in Table Viewer. See Restoring the Layout (above) for more information.