Customizing the Customer Report
Now you are going to customize the Customer Report in the DataFlex Studio. In the process, you will learn what the code generated by the wizard does and how to add your own custom code to add features to the ReportView that the wizard did not provide.
Completing the ReportView's Layout
Let's start by completing the controls we want to have in the completed ReportView.
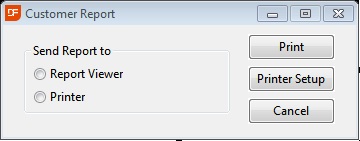
The ReportView should look like this after the wizard completes:
-
Enlarge the view vertically to make more room at the bottom of the view. Resize the "Send Report to" group horizontally so it only takes up about half the ReportView.
-
Drag the Print, Printer Setup, and Cancel buttons below the "Send Report to" group. Align the buttons next to each other from left to right, in this order: Print, Cancel, "Printer Setup". You can use the Align | Top and "Align with Container" | Left-To-Right options from the context menu to align the buttons. When you are done, the ReportView should look like this:

-
Drag and drop a RadioGroup control onto the view, next to the existing "Send Report to" RadioGroup. By default, this RadioGroup will have 3 Radio controls in it. Delete the bottom Radio control. Rename the top Radio to
oNumberRadioand change its label to "Number". Rename the bottom Radio tooNameRadioand change its label to "Name". Resize the new RadioGroup to be the same size as the "Send Report to" RadioGroup and line up the two RadioGroups horizontally. Change the name of the new RadioGroup tooOrderand its label to "Report Order". -
Drag and drop a CheckBox control onto the view and place it beneath the "Report Order" RadioGroup. Change the CheckBox's name to
oCommentsCkBxand its label to "Print Comments". The ReportView should now look like this:

-
You may notice that the Radio objects in the 2 RadioGroups are not necessarily aligned. You want to align them so that the Number Radio is at the same relative position inside the "Report Order" RadioGroup as the "Report Viewer" Radio inside the "Report Order" RadioGroup. There is no alignment tool to allow you to do this. The only way to do this is to copy the Location property of the "Report Viewer" Radio (it should be "12,6") to the Number Radio in the Properties window. Then copy the Location (it should be "24,6") of the Printer Radio to the Name Radio.
-
Last, ensure that the object order of the objects in this view is correct. The order in which visible objects will be navigated to when the program runs is the same as their order (from top to bottom) in Code Explorer. In Code Explorer, you can view the object order and adjust it by right-clicking on any object and selecting Move Up or Move Down from the context menu. Once complete, your object ordering should match the object order shown below:
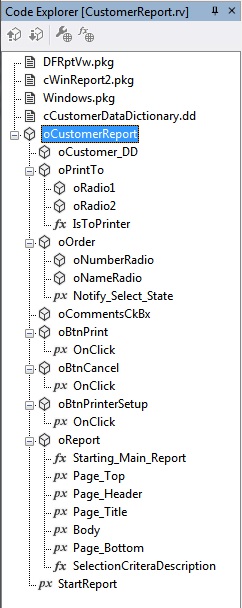
This completes the layout of the ReportView; all the controls have been placed onto the ReportView and are in their final location.
Coding the ReportView
Next, we will study the code created for you by the wizard and add some custom code.
Determining which Radio is Selected
Double-click on the oPrintTo RadioGroup object to view its code. This object has one function named IsToPrinter:
Function IsToPrinter Returns Boolean
    Integer iRadio
    Get Current_Radio to iRadio
    Function_Return (iRadio=1)
End_Function
This function gets the Current_Radio property of oPrintTo, which tells us which of the child Radio objects is currently selected. Since there are only 2 Radios in this RadioGroup, which determine if the report should print to the screen or the printer, the function then returns this as a Boolean result via this line:
Function_Return (iRadio=1)
We will now create a similar function for the oOrder RadioGroup, which will return whether the report should be ordered by name or number. Delete the following code from the oOrder RadioGroup (this code was created when you dragged the control onto the ReportView from the Class Palette):
Procedure Notify_Select_State Integer iToItem Integer iFromItem
    Forward Send Notify_Select_State iToItem iFromItem
    // for augmentation
End_Procedure
// If you set Current_Radio, you must set it AFTER the
// radio objects have been created AND AFTER Notify_Select_State has been
// created. i.e. Set in bottom-code of object at the end!!
// Set Current_Radio to 0
Add the following function to the object oOrder:
Function IsSortedByNumber Returns Boolean
    Integer iRadio
    Get Current_Radio to iRadio
    Function_Return (iRadio=1)
End_Function
Starting the Report
Add the following line of code to the oCustomerReportReportView object:
Property Boolean pbComments False
The value of this property will determine whether the report will print the Comments column of each Customer record or not.
Now, modify the existing StartReport method in oCustomerReport until the code looks as shown below:
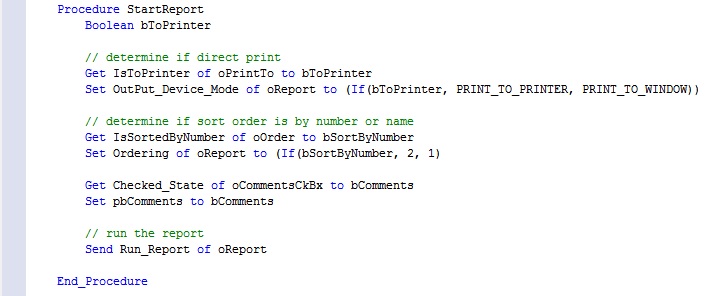
The first block of code in StartReport:
// determine if direct print
Get IsToPrinter of oPrintTo to bToPrinter
Set OutPut_Device_Mode of oReport to (If(bToPrinter, PRINT_TO_PRINTER, PRINT_TO_WINDOW))
calls the IsToPrinter function in the oPrintTo RadioGroup to see whether the user wants to print the report to the screen or the printer. It then sets the Output_Device_Mode property of the oReport cWinReport2 object to Print_To_Printer or Print_To_Window, depending on the returned result of IsToPrinter.
The second block of code:
// determine if sort order is by number or name
Get IsSortedByNumber of oOrder to bSortByNumber
Set Ordering of oReport to (if(bSortByNumber, 2, 1))
does the same thing to tell the report object in which order to print the report.
The third block of code:
Get Checked_State of oCommentsCkBx to bComments
Set pbComments to bComments
sets the pbComments property based on whether the user has checked the "Print Comments" checkbox.
The last block of code:
// run the report
Send Run_Report of oReport
tells the report object to start processing the report.
The Report Object
Now, let's customize and review the code in the oReport cWinReport2 object.
Add this line of code declaring the pbLandscape property above Procedure Starting_Main_Report:
Property Boolean pbLandscape False
Starting_Main_Report is the main method for changing parameters in WinPrint2 reports. This is the place to change things like margins and paper orientation. Change the existing Function Starting_Main_Report to this:
Function Starting_Main_Report Returns Integer
    Integer iIndex
    Boolean bOn bErr
    Send DFSetMetrics wpm_cm
    Send DFSetMargins 1 1 1 1
    Get pbComments to bOn
    Send DFSetLandscape (if(bOn, True, False))  // This can be used to force a page orientation
    Get DFGetLandscape to bOn
    Set pbLandscape to bOn
    Forward Get Starting_Main_Report To bErr
    Function_Return bErr
End_Function
The customization here, from what the wizard generated for us, is that we determine if the user wants to print Customer.Comments, and if so, we change the paper orientation to Landscape.
Next, change Procedure Page_Top so that the page number prints on the left side of the page instead of the right. Replace the existing Procedure Page_Top with this one:
// Page_Top is printed first at the top margin of each page
Procedure Page_Top
    string sFont
    integer iFontSize iStyle
    Move "arial" to sFont
    Move 8 to iFontSize
    Move (Font_Default) to iStyle
    DFFont sFont
    DFFontSize iFontSize
    DFBeginHeader DFPageTop
    DFHeaderFrame Hdr_NoFrame
    DFHeaderPos Hdr_Left
    DFWriteLn ("Page:" * "#pagecount#") iStyle
    DFEndHeader
End_Procedure
We could also have simply changed the (Font_Right) in the original line of code to (Font_Default), but using a variable for the style makes it easier if we later want to change the style on more than one line of code in this procedure.
Next, modify the existing Procedure Page_Title to add a column header (title) for the Customer.Comments column if the user has selected to print this column via the checkbox. The complete code for Procedure Page_Title should look like this:
Procedure Page_Title
    string sFont
    integer iFontSize iHeaderStyle iFill iBorder
    Boolean bOn
    Get pbLandscape to bOn
    Move "arial" to sFont
    Move 8 to iFontSize
    Move (Font_Bold + rgb_dBlue) to iHeaderStyle
    Move (rgb_Grey) to iFill
    Move (rgb_Grey) to iBorder
    DFFont sFont
    DFFontSize iFontSize
    DFBeginHeader DFPageTitle
    DFHeaderPos Hdr_Left
    DFHeaderFrame Hdr_Margins 0 iBorder iFill
    DFHeaderMargin HM_TopInner 0.01
    DFHeaderMargin HM_BottomInner 0.01
    DFHeaderMargin HM_BottomOuter 0.16
    DFWritePos "Number" 0.1 (iHeaderStyle)
    DFWritePos "Customer Name" 2 (iHeaderStyle)
    DFWritePos "Address" 7 (iHeaderStyle)
    DFWritePos "City" 12 (iHeaderStyle)
    DFWritePos "St." 15 (iHeaderStyle)
    DFWritePos "Zip" 17 (iHeaderStyle)
    If bOn begin
        DFWritePos "Comments" 19 (iHeaderStyle)
    end
    DFWriteLn
    DFEndHeader
End_Procedure
This block of code:
If bOn begin
    DFWritePos "Comments" 19 (iHeaderStyle)
end
prints the Comments column header if the user has checked the "Print comments" checkbox.
The next method to modify is Procedure Body. Replace the existing, wizard-created method with this modified one:
Procedure Body
    string sFont
    integer iFontSize iStyle
    Boolean bOn
    Send Update_Status (String(Customer.Customer_number))
    Get pbLandscape to bOn
    Move "arial" to sFont
    Move 8 to iFontSize
    Move (font_default) to iStyle
    DFFont sFont
    DFFontSize iFontSize
    DFLineCheck 5
    DFWritePos Customer.Customer_Number 0.8 (iStyle + Font_Right) 0
    DFWritePos Customer.Name 2 iStyle -1 4.98
    DFWritePos Customer.Address 7 iStyle -1 4.98
    DFWritePos Customer.City 12 iStyle -1 3.98
    DFWritePos Customer.State 15 iStyle -1 0.98
    DFWritePos Customer.Zip 17 iStyle -1 1.98
    If bOn begin
        DFWritePos Customer.Comments 19 iStyle -1 0
    end
    DFWriteLn
End_Procedure
Just as in Procedure Page_Title, we check to see if the user wants to print the Customer.Comments column. Here, we will print the contents of the column if the checkbox is checked. There are 2 additional customizations in this code: the first is this line:
Send Update_Status (String(Customer.Customer_Number))
This updates the WinPrint 2 Report Viewer to display the current record's customer number as records are being processed. With the limited number of records in the sample customer table, you may not see this happening, but if you create a report like this for a large table with thousands or millions of records, you will want to display something like this to your users while the report is processing.
The second customization is this line of code:
DFLineCheck 5
DFLineCheck checks that the indicated number of lines (in this case 5) will fit on the page. If they do not, the report will insert a page break and print the next line on the new page. This is done here because Customer.Comments is a text column that may wrap over several lines. This ensures that each record is printed completely on a page and not split onto 2 pages.