Aligning Web Controls
Let's face it. The Hello, World web view you created, although minimalist, isn't particularly attractive. That really wide button just looks odd. This topic will get you started with learning about layouts and alignments.
Important!
This section requires that the "Hello, World" web view was created in the QuickStart workspace.
If this is not the case, switch to the Creating Your First Web View step now and return here when you have completed it.
In accordance with most modern web application frameworks, DataFlex does not support the use of absolute coordinate positioning of controls. Instead, the underlying positioning system is “flow layout,” which simply positions controls as they occur, from left to right and top to bottom.
The order of control objects in your view determines the position of the control in the layout.
Two additional layout mechanisms are supported that help you to manage the flow: panels and columns.
- Take a look at the source code to
HelloWorld.wo. You will notice that the outer container in this source file is a web view (classcWebView). Nested inside this web view is another container object, a web panel (classcWebPanel). The controls you have been working with, a form (cWebForm](../VdfClassRef/cWebForm.md)) and button (cWebButton](../VdfClassRef/cWebButton.md)), are placed inside this web panel.
While you could simply place controls directly inside a web view, starting with at least one panel object makes it easier for you to later add more panels and makes working on layouts easier. Thus, the web view templates and wizards create at least one web panel for you (some create more than one web panel).
- Web panels are designed to simplify flow layouts. Each panel can contain up to 5 child panels, each of which, in turn, can contain up to 5 child panels, etc.
At each level, there must be at least 1 center panel. The peRegion property determines which region a panel occupies inside its parent container.

- The center panel (
peRegion = prCenter) is the class default. In yourHelloWorld.wosource code, you will see that there is no explicit region property set inside the objectoWebMainPanel.
Select the oWebMainPanel object declaration line in the code editor, or simply click on it in Code Explorer. In the Properties window, look for the peRegion property. You can see that its value is prCenter.
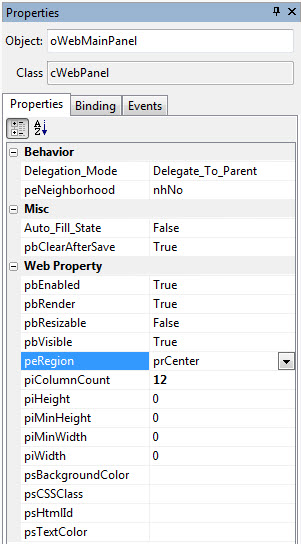
The panel object inherits this value from the class the object is based on, its superclass. This is why this value in the Properties panel is not in bold. Note that the piColumnCount property's value (12) is in bold. This means that the value in the current object is different from the inherited superclass value. It also means that the changed value is explicitly written out in code. If you look at the code editor again, you can see the line of code doing so:
Set piColumnCount to 12
Inheritance
Classes and inheritance are core concepts of object-oriented programming (OOP). Read more about these concepts in the Language Guide.
- You already looked at column count (the
piColumnCountproperty). This property divides the current panel (in this case, the center/only panel) into 12 evenly divided columns.
Click F7 to open the WebApp Designer. Notice that both the Name form and the Go button in the Hello, World web view are aligned all the way to the left of the view. The form doesn't quite look like it is left aligned, but it includes the label. If you select the oNameForm object in Code Explorer, you will see the entire control selected and shown with a blue border around it in the WebApp Designer.

-
Select the
oHelloWorldweb view object and change itspiWidthproperty from 700 to 0. A width of 0 means that the view has no fixed width and will stretch as wide as the browser window/tab is stretched by the user. Now, if you drag the WebApp Preview window wider and wider, the form and button that were already stretched before just look silly, especially if you have a wide monitor resolution. -
Being able to stretch the view to fill the screen makes sense for some applications, but not really for a simple view like yours. Select the
oNameFormobject and change itspiColumnSpanproperty from 0 to 6. Column span determines how many of the 12 columns in the current panel the control should span across. Again, a column span of 0 means that the control should stretch across all columns in the panel. -
Select the
oGoButtonobject and change itspiColumnSpanto 3 and itspiColumnIndexto 3. The result should look like this:
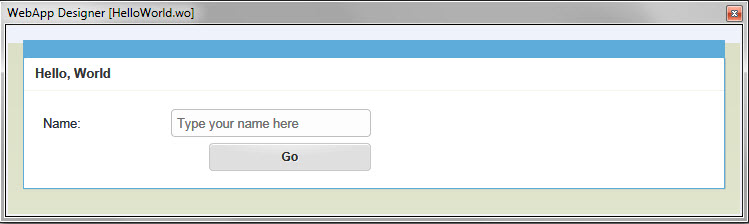
The Name form now spans 6 columns (columns 1 - 6) and looks a bit more realistic in size for a form that should contain a name. Making the button span 3 columns and start in column 3 aligns the right edge of the button with the right edge of the form. Even if the viewer resizes the browser window, the form and button will slightly grow and shrink in width, but this edge alignment will stay the same.
- The view is really still too wide for these 2 controls, though. We can adjust this by changing the column count of the main panel inside the view. You can do so easily inside the WebApp Designer. Select the
oWebMainPanelobject in the WebApp Designer. If you got it right, you should see something like this in the WebApp Designer:
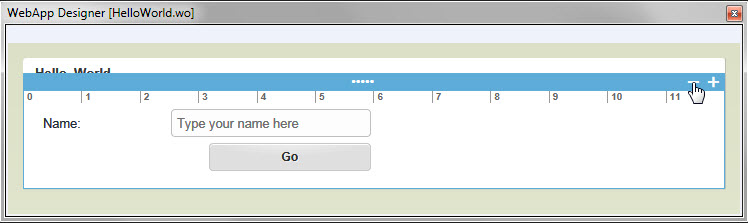
You can now click on the minus sign in the WebApp Designer to visually reduce the column count one at a time and see how the view looks each step of the way. Try doing so until the column count is 7. When done, the view should look like this:

You really want to think about whether to use a fixed width or variable width layout when designing a view. A fixed width gives you much more control over the finished look of the view. Your test view is simplistic, of course, but with these same properties, you can do a lot. If, for example, you want more fine-tuned control over object placement in a busy panel, you could adjust the panel's piColumnCount to 24 and adjust various objects' column spans and column counts to your liking.
Next Step
Next, you will learn how to create web services: Creating Your First Web Service