Object Selection and Manipulation
Control Selection (Designer)
Click any control in the designer to select it. The effect is the same as selecting the corresponding object in Code Explorer: a “selection box” is drawn around the control. The clicked object is also selected in Code Explorer, and its properties are shown in the Properties Panel.
Double-Clicking
Double-clicking a control will move the cursor in the Code Editor to the corresponding object. This effect is the same as double-clicking the corresponding object in Code Explorer.
Changing Tab Pages
If your view has a tab container with different tab pages, you can click on the various tab captions to change the currently selected page, just like in a running web application. The designer does not directly support creating a new tab page.
Changing the Top Web Card
Card Container objects (cWebCardContainer) are rendered in the designer with a special set of colored dots, where each dot represents a child card object. The dots are arranged left to right, representing the first to last card. The red-colored dot represents the currently displayed card.

You can click on the different dots to bring to the front each respective card. The designer does not directly support creating a new card.
Menus
When the designer is displaying a web component containing a menu bar (or menu button), you can hover the mouse over any menu or sub-menu to reveal the list of menu items it contains. The designer does not support visual modeling of menus.
Control Manipulation
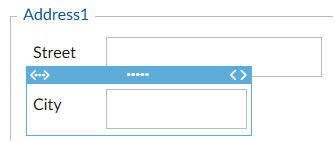
The selection box contains tools that allow you to manipulate several important visual properties of the selected control:
-
Drag the “<…>” symbol left or right to increment or decrement the object’s
piColumnIndexproperty. As you drag the symbol, you will see that the object’s container panel will show its layout columns according to the panel’spiColumnCountproperty. The drag action will “snap” the control to the nearest layout column. Once the control’s right side hits the right edge of its container panel, you will no longer be able to drag it further to the right. -
Drag the “…..” symbol to move the selected control to a different location in the object order. As you drag the control, you will see an “I” beam symbol following your mouse pointer. The “I” beam will “snap” to the nearest control location to your mouse position. When you drop the control, the entire corresponding DataFlex object will be moved to the location that follows the object indicated by the “I” beam. This will trigger the entire page to be redrawn so that the designer can correctly position all of the controls according to the flow layout rules. This drag operation is equivalent to actually moving the object declaration code in the Code Editor.
-
Drag the “<>” symbol left or right to increment or decrement the control’s width. This action manipulates the object’s
piColumnSpanproperty. As you drag the symbol, you will see that the control’s container panel will show its layout columns according to the panel’spiColumnCountproperty. The drag action will “snap” the control width to the nearest layout column.
Panel Manipulation
Selected panel objects support additional manipulation in the designer:

-
If the selected object supports the
piColumnCountproperty (i.e., it is a panel or container), then when it is selected, the number and position of each layout column is indicated. Click the plus or minus symbols “+-“ to increment or decrement the panel’s column count. -
If the selected object supports the
peRegionproperty, then you can drag the top bar of the selected panel to manipulate the panel’s region, i.e., top, bottom, left, right, or center. While dragging a panel, all of the available panel regions will be indicated by a target box that appears in the available region. Drag the mouse inside one of the target boxes to choose that region. If all regions are already occupied by other panel objects, then only the panel’s current region will be indicated (via a rounded oval, e.g., the sample image above shows a panel withpeRegion = prTop). -
You can also drag a panel inside another panel and select its region within that panel to create nested panels.
-
When you select a panel whose region is set to left or right, a “resize bar” appears on the left or right edge of the panel that you can drag left or right to change the panel’s fixed width. If the region is top or bottom, it is also possible to set a fixed height for the panel. In this case, the “resize bar” appears on the top or bottom edge of the panel. If you do not set a fixed height for a top or bottom panel, then its height is determined by the controls that it contains; usually, this is what you want. A center panel should never have a fixed height or width.
Grid Column Manipulation
-
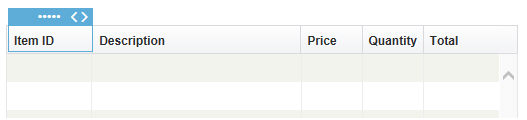
Select a grid column by clicking on the column header.
-
Drag the “…..” symbol to move the selected column to a different location in the column order. As you drag the column, you will see an “I” beam symbol following your mouse pointer. The “I” beam will “snap” to the nearest column location to your mouse position. When you drop the column, the entire object will be moved to the location that follows the object indicated by the “I” beam. This drag operation is equivalent to actually moving the object declaration code in the Code Editor.
-
Drag the “<>” symbol left or right to increment or decrement the column’s width. This action manipulates the column’s
piWidthproperty.
Hot Keys
Up Arrow / Down Arrow
Use these keys to move the selected object up or down in the view’s tab order. This operation has the effect of moving the object declaration code relative to its sibling object in the web view you are modeling.
Left Arrow / Right Arrow
Use these keys to decrease/increase the selected object’s column index. This has the effect of moving the horizontal location of the object left or right. You are only able to move the object left or right if it fits within the bounds of its container object. This means you may first need to lower the object’s column span before increasing the column index.
Ctrl + Left Arrow / Ctrl + Right Arrow
Use these keys to decrease/increase the selected object’s column span. This has the effect of making the object narrower/wider.
Alt + Left Arrow / Alt + Right Arrow
When the selected object is a container, you can use these keys to increment or decrement the container’s column count. When you increment the column count, any nested child objects that have a column span setting will become narrower, and you are able to perform horizontal positioning of objects more accurately. Decrementing the column count has the opposite effect.