Creating a Web Service Client Class
If your Studio is not currently open to the QuickStart workspace, please switch to it now. To learn how to switch workspaces in the Studio, refer to Selecting a Workspace and return here when you have completed it.
Important!
This section assumes that you have completed the Creating Your First Web Service tutorial. Since the code you will create here will consume the Greeting Web Service created in Creating Your First Web Service, you must complete that tutorial before continuing with this section.
To simplify the development of Web Service client applications, DataFlex Studio creates Web Service client classes for you. A Web Service client class is a Studio-generated class that locally represents the exposed functionality of a Web Service. The class defines methods that represent the actual methods exposed by a Web Service. When the client application creates an instance of the class, it is capable of calling the Web Service methods as if the Web Service were a locally available component.
So, the first step in calling an existing Web Service from a DataFlex application is to create a Web Service client class, regardless of whether your application is a Windows, Web, or Web Service application.
Before you can create a Web Service client class, you need to locate the service’s WSDL file. You can do this by loading your web browser and pointing to a WSDL file. Any service available on the web should have a mechanism for locating its WSDL.
Steps to Create a Web Service Client Class
-
Open the Studio to the QuickStart workspace.
-
Click on the Create New button on the Studio’s toolbar.

-
Click on the Class tab of the Create New... dialog.
-
Double-click the Client Web Service Class icon.
-
Type or paste the URL for the WSDL file into the WSDL URL form and click the Parse button.
The address to the Greeting Web Service you created in the Creating Your First Web Service tutorial should be http://localhost/greetingwebservice/greetingservice.wso?WSDL.

You can now see the class that the Web Service Client Class Generator will generate for you on the Class tab page. You can view the WSDL file on the WSDL tab page. -
Click the Generate Class button to generate the class. The "Create Web Service Client Class" dialog will pop up:
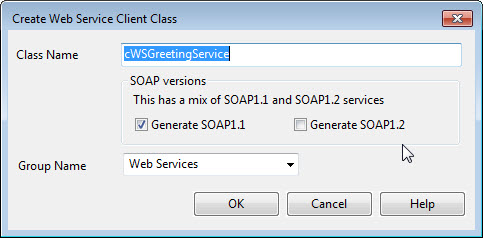
You can see in this dialog that it will generate a class namedcWSGreetingService, which is local to the current workspace (in our case QuickStart), and it will place an icon for this class in the "Web Services" group of the Studio's Class Palette. -
Leave everything in this dialog as it is and click OK to create the class. When the Web Service Client Class Generator returns you to the Studio, you will see the package file in which the Web Service client class was created open so you can view the code of the class that was created.