EnableMarkup Property
Description
Allows the use of a XAML snippet to be used for the Caption of this control.
Property Type
Read-write property
Syntax (Visual Basic)
Public Property EnableMarkup() As Boolean
Remarks
If set to True and a valid XAML snippet is set to the Caption of this control, then the Caption will be displayed as rendered XAML.
If set to False, then any text in the Caption, even if valid XAML, will get displayed in plain text.
The picture below shows many controls using snippets of XAML:
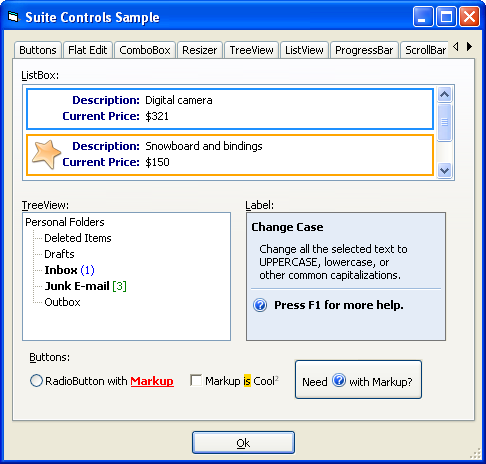
Example
Markup Examples (Visual Basic)
' This sample shows how to display an Outlook style tree control using Markup:

' VB 6 code snippet
TreeViewMarkup.EnableMarkup = True
TreeViewMarkup.Nodes.Add , , "Root", "Personal Folders"

TreeViewMarkup.Nodes.Add "Root", xtpTreeViewChild, , "Deleted Items"
TreeViewMarkup.Nodes.Add "Root", xtpTreeViewChild, , "Drafts"
TreeViewMarkup.Nodes.Add "Root", xtpTreeViewChild, , "" & _
    "Inbox "
TreeViewMarkup.Nodes.Add "Root", xtpTreeViewChild, , "" & _
    "Junk E-mail "
TreeViewMarkup.Nodes.Add "Root", xtpTreeViewChild, , "Outbox"

TreeViewMarkup.Nodes("Root").Expanded = True

' ************************************************

' Below is a sample that shows how to mix an image with text on a button using Markup, note the image is loaded from an image file.
' To reference an image stored in the ImageManager control, simply set "Source" to the id of the image to load:

' VB 6 code snippet
PushButton1.EnableMarkup = True
PushButton1.Caption = "Need " & _
    "" & _
    " with " & _
    "Markup?"

' ************************************************

' The following sample illustrates the same techniques as the sample above, however, this sample shows how
' to create more elaborate XAML using only the Label control:

' VB 6 code snippet
LabelMarkup.EnableMarkup = True
LabelMarkup.Caption = _
    " & _" &
    "Background='#e4ecf7'>" & _
    "" & _
    "   Change Case" & _
    "" & _
    "   Change all the " & _
    "selected text to UPPERCASE, lowercase, or other common " & _
    "capitalizations." & _
    "   " & _
    "   " & _
    "   " & _
    "         & _" &
    "VerticalAlignment='Center' FontWeight='Bold'>Press F1 for" & _
    " more help." & _
    "   " & _
    "" & _
    ""
See Also
Copyright (c) 1998-2024 Codejock Technologies. All rights reserved.