CustomIcons Property
Description
Allows you to add custom icons to the "Change Button Icon" popup that is displayed in the context menu when a user right-clicks on a control during CommandBar customization. This allows the user to change the icon of the control using your own icons.
Property Type
Read-only property
Syntax (Visual Basic)
Public Property CustomIcons() As [ImageManagerIcons](XtremeCalendarControl~ImageManagerIcons.md)
Remarks
When adding icons, the IconId must start with 1 and increment by 1 for each icon added. So the IconId will be numbered 1, 2, 3, 4,... N.
The suite provides 42 "built-in" icons that you can choose from, and they are automatically displayed in the "Change Button Icon" popup menu if you do not remove them. If you do not remove the "built-in" icons that are provided with the toolkit, then you should start your numbering at 43. If you start at 1 and you did not remove the "built-in" icons, then you will overwrite some of the "built-in" icons. So you would number your icons 43, 44, 45,... N. You could even keep some of the "built-in" icons and overwrite the ones you don't need with your own custom icons.
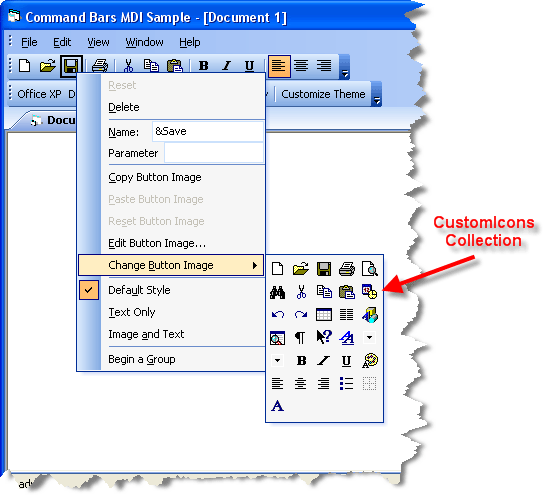
The picture below shows the "Change Button Image" popup menu displaying some custom icons. You are no longer limited to the "Built-In" icons that come with the CommandBars.
Example
This sample illustrates how to add custom icons to the Change Button Icon popup that is displayed when a control is right-clicked during CommandBar customization.
Private Sub CommandBars_Customization(ByVal Options As XtremeCommandBars.ICustomizeOptions)

    '==========================================================================================================
    ' Adding Images to the "Change Button Icon" popup in the context menu
    '==========================================================================================================
    ' This will illustrate how to add your own custom images to the "Change Button Image" popup
    ' that allows users to change the image of a control.

    ' Array of commands used to load images from a bitmap, this will be the value assigned to the
    ' controls IconId property. The images will be displayed in the "Change Button Image" popup of the customization context menu
    Dim ChangeButtonImageIconArray(0 To 7) As Long

    ' There are 8 icons in the Bitmap file, the bitmap file is 128x16,
    ' which contains 8 16x16 icons. You need to make sure that there is
    ' an element in the array for each icon in the Bitmap.
    ' Width of icons = Width of Bitmap / number of elements in array
    ' I.e. Width of icons = 128/8 = 16
    ' These values represent the IconId that will be assigned to the control, this
    ' allows you to determine which icon is being used for your controls.
    ' IconId cannot be Zero (0), so do not assign 0 to any of the array elements.
    ' IMPORTANT: The IconId must start with 1. So IconId = 1, 2, 3, 4, 5,....N
    ChangeButtonImageIconArray(0) = 1
    ChangeButtonImageIconArray(1) = 2
    ChangeButtonImageIconArray(2) = 3
    ChangeButtonImageIconArray(3) = 4
    ChangeButtonImageIconArray(4) = 5
    ChangeButtonImageIconArray(5) = 6
    ChangeButtonImageIconArray(6) = 7
    ChangeButtonImageIconArray(7) = 8

    ' Remove the "built-in" images provided with the suite
    Options.CustomIcons.RemoveAll

    ' Passing the ChangeButtonImageIconArray for the "Commands" parameter will add an icon to the collection
    ' of icons for each item in the array. So Number of icons added = Number of elements in array.
    ' Icon width = Total width of Bitmap/Number of elements in array.
    Options.CustomIcons.LoadBitmap App.Path & "\Icons\ChangeButtonIcons.bmp", ChangeButtonImageIconArray, xtpImageNormal

End Sub
See Also
Copyright (c) 1998-2024 Codejock Technologies. All rights reserved.