DataFlex and Windows
Perhaps the most notable change in Windows for developers is User Account Control (UAC) and the tightening of installation folders and their use.
User Account Control can basically be thought of as every user running as a Standard User. Even Administrator accounts are running as a Standard User with all their restrictions. For an Administrator user to operate with full Administrator rights, its user account must be elevated with explicit consent. Only a program running as an elevated Administrator user has full Administrator rights.
Elevated Administrator rights are only achieved by explicitly marking a specific program as requiring elevated Administrator rights. When launching a program marked as such, you will be prompted with a special user interface dialog for explicit user consent.
This change, where Administrators are effectively not running with Administrator rights by default, combined with tightened security on common file system folders, is by far the most common issue regarding migrating applications to Vista and higher. That being said, if your application does not require Administrator rights to operate properly in legacy revisions of Windows, such as Windows XP, you can expect very few, if any, issues with UAC when you update to the most current DataFlex revision. Nonetheless, it's very important to understand the implications of UAC.
Backwards Compatibility
For backwards compatibility, Windows Vista and 7 employ a technique referred to as file and registry virtualization. This is used when programs that are not running with elevated Administrator rights are trying to modify protected files and registry keys. This should be thought of as a temporary band-aid, and in many cases, it can do more harm than good. For example, accidentally virtualizing database files would create local copies of the data for each user, where changes cannot be seen by other users. Such virtualization occurs without any user notification by the operating system, so this can occur accidentally and may go completely unnoticed.
File and Registry Virtualization is only enabled for programs that are running in compatibility mode. All DataFlex applications should explicitly have this feature disabled. This feature is automatically disabled for any new projects you create in DataFlex with the appropriate markup in the program manifest file.
When you migrate an existing workspace to the latest DataFlex revision by running the migration wizard (which automatically occurs when you open a specific workspace for the first time in the latest version of DataFlex), all your projects in that workspace are also automatically protected against File and Registry virtualization. The migration wizard automatically adds the appropriate markup to the existing program manifest files, and new manifest files are created for projects without existing manifest files.
For more information about File and Registry Virtualization, see Protect Your Application from File and Registry Virtualization.
Changes in DataFlex Related to UAC
DataFlex includes many changes to ensure that it operates smoothly with UAC enabled. It's therefore recommended to upgrade to the latest version of DataFlex for the best experience.
Changes for Developers
Many of the UAC-related changes in DataFlex are internal and/or related to DataFlex tools and utilities such as the Studio and the WebApp Administrator. These changes ensure that you will have a smooth and consistent experience using the various development tools on Windows 7. Although these changes typically do not impact your application directly, knowing about these changes can still be very valuable when preparing your application for Windows 7 support.
The most visible UAC-related changes in DataFlex are regarding the installation layout and registry usage. You will notice that the examples have been relocated and moved out of the general DataFlex installation folder. It's not recommended to install files that are modified as part of normal usage under the standard %ProgramFiles% directory. Modification to the %ProgramFiles% directory is normally restricted to elevated Administrator users.
For this reason, the examples have been relocated to a place where all users are expected to be able to modify the files. This ensures that you can explore the examples as a Standard User without elevated Administrator rights.
You will notice that the examples are located under the local disk root folder, enabling any user on the specific machine to access the examples, just like any user on the machine can run the Studio. It’s common installation practice for an Administrator user to install the software, while a Standard user can run the software. This way, the Standard User still has full access to modify and explore the examples while not having access to modify the installed software.
There are also some new functions and updated commands in DataFlex, dealing specifically with UAC.
- The global function
IsAdministratorreturns whether the user is running with elevated Administrator privileges. - The
RunProgramcommand has been updated with a new parameter, RunProgram Shell, which enables the UAC credential (user consent) prompt. When launching a program that is marked as requiring elevated Administrator rights, you must use RunProgram Shell to enable the UAC prompt. If you use RunProgram without the Shell parameter, the program will fail to launch correctly if the current program isn't already running with elevated Administrator privileges.
Some operations in the Studio sometimes require elevated Administrator privileges; these include, but are not limited to:
- Creating a new Web Application. This will create the Internet Information Server (IIS) web share and configure the web application, which usually requires elevated Administrator privileges.
- Debugging applications that are marked as requiring Administrator privileges.
- System-level configurations, such as global driver configurations.
- Precompiling system packages.
The Studio has been updated to detect whenever such a situation occurs, and it will display a message telling you to restart the Studio with elevated Administrator privileges and try the operation again. Most of these situations are rare and often considered administrator-level work; for this reason, it’s recommended that you only do this when absolutely required.
Except for these few occasions, which the Studio automatically informs you about, the Studio has been modified so that it can run with Standard User privileges without requiring elevated Administrator privileges.
Changes for Deployment
The most notable change in deployment with regards to UAC are the new Local Workstation vs. Network Accessible installation types. When installing the DataFlex Client Engine (runtime installation), there is a new required selection that specifies the type of installation. The type of installation mainly controls where the licensing files get installed.
Because of UAC and tighter control of security in Windows, the license files (termlist.cfg and .dfr files, etc.) cannot be installed under the standard %ProgramFiles% directory, as elevated Administrator rights are required to modify files in this location.
Local Workstation Deployment
When selecting a Local Workstation type of installation, it's assumed that the client engine is only used by this one particular machine. The license files are installed under the standard Common_AppData directory (e.g., "C:\Documents and Settings\All Users\Application Data" on Windows XP, "C:\ProgramData" on Windows 7). This ensures that all users on the specific machine can access the license files appropriately. This type of installation is appropriate only for single workstation installations. Network users will not be able to access the license files.
Summary:
- Preferred deployment method for single machine access, such as single-user scenarios, or multi-user scenarios using Terminal Services/Citrix only.
- DataFlex installed under write-protected folder
%ProgramFiles%. - License files installed under standard Common_AppData directory.
Network Accessible Deployment
When selecting Network Accessible type of installation, it's assumed that the client engine will be shared by multiple users from multiple machines across a network. This is the most common type of deployment scenario. In this case, you cannot install to the %ProgramFiles% directory; you should select a directory that is accessible by network users. The license files will be installed into the Bin directory, and all users must have access to modify files in this directory.
Summary:
- Used in multi-user scenarios where multiple users from multiple machines access the DataFlex application via Windows File Sharing.
- DataFlex installed into a shared directory with write access for all users.
- License files installed at the same shared location in the Bin directory.
Client Area Sizing
Many issues related to Windows Vista and higher have been addressed in DataFlex. So for the best experience running your application on Windows Vista and higher, it's recommended that you upgrade to the latest version of DataFlex. But perhaps the most important change is the introduction of Client Area Sizing.
How Different Windows Platforms Impact View/Dialog Sizing
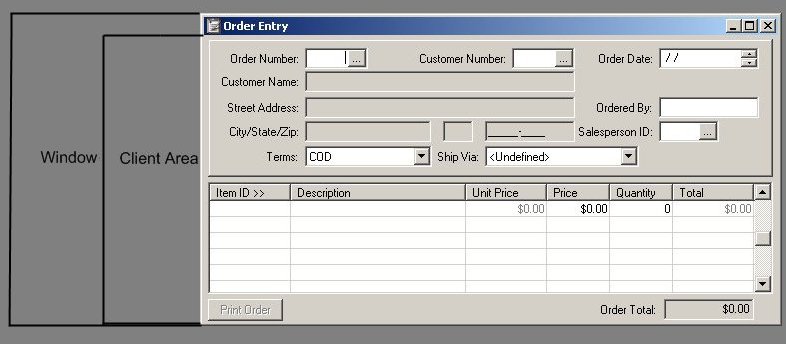
In revisions of DataFlex prior to 2008, the size of views/dialogs always referred to the entire bounding rectangle of the window. If you previously migrated your applications from Windows 2000 to Windows XP, you may have already experienced the problems with the increased size of the non-client area and the effects on your views and dialogs. To illustrate, here’s a typical DataFlex view, with the window and client area regions marked:
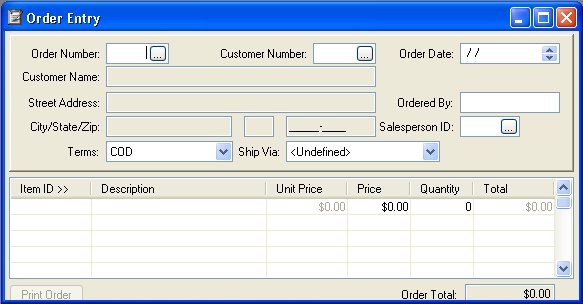
When the size of the non-client area changes, it leaves less room for the client area, which often results in controls being clipped at the bottom, like this:
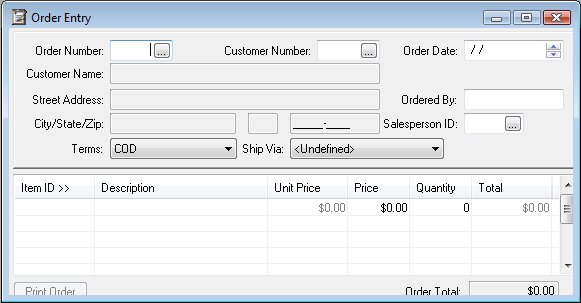
The default theme in Windows 7 increases the size of the non-client area further, clipping controls on the right. So it could look something like this:
Client Area Sizing to the Rescue
DataFlex now uses client area sizing, which means that views and dialogs will size according to the available client area in the window, instead of the window bounding rectangle. This means that when displayed on different platforms, the size of the client area will always remain the same, ensuring that your view/dialog will always display correctly.
The result of using client area sizing in DataFlex is that all views and dialogs in your application will display correctly on all platforms:

Client area sizing provides a much better mechanism for sizing views and dialogs. Views and dialogs can be designed on any platform and then deployed with the assurance that they will look great everywhere. For this reason, we have made client sizing the default for all views and dialogs. This means that the size of your existing views and dialogs, which was based on the window bounding rectangle in prior revisions, will need to be adjusted. This can be adjusted by either disabling client sizing or by changing the size of the view/dialog. Changing the size is the recommended approach. The workspace migration will perform either of these adjustments for you.
Taking Advantage of Client Area Sizing
All new views and dialogs created in DataFlex use client area sizing by default. This ensures that new views and dialogs always display correctly on all platforms.
Existing views and dialogs are automatically converted to use client area sizing as part of migrating your workspace to the latest DataFlex revision. When you migrate an existing workspace to the most current DataFlex version by running the migration wizard (which automatically occurs when you open a specific workspace for the first time in the latest version of DataFlex), all the views and dialogs in all the projects within that workspace are automatically adjusted for client area sizing by default. You can also choose to disable client area sizing during migration.
To manually adjust a view or dialog after migration, you simply follow these two steps:
- Ensure that client area sizing is enabled by verifying that the
pbSizeToClientAreaproperty in the view/dialog is set to True (this should already be the case, as it is set to True by default in the superclass). - Adjust the size of your view/dialog in the Visual Designer to an appropriate size. When done, your view/dialog will display correctly on all platforms.
Client area sizing is so useful that you very rarely want to set this property to false, which is why it’s set to true by default. By migrating your existing DataFlex applications to the latest DataFlex revision, you will ensure that your views and dialogs will display correctly on Windows 7.
Client Area Sizing and Anchors
Note that the use of anchors can sometimes disguise the problems with clipping and cause controls in the view to relocate and overlap each other. Even though it may not look like it, this is caused by a smaller client area causing the controls to relocate. This is fixed by using client area sizing.
Client Area Sizing and piMinSize/piMaxSize
Client area sizing changes the metrics for all size properties, including Size, GuiSize, piMinSize, and piMaxSize. This makes all size-related properties consistent. When client area sizing is turned off, they all refer to the window bounding rectangle, and when client area sizing is turned on, they all refer to the client area size.
If Size is set smaller than piMinSize, or larger than piMaxSize, you may experience strange results. This isn’t really related to Client Area sizing, but the problem may expose itself when enabling client area sizing.
When existing views and dialogs are converted for client area sizing as part of migrating to the latest DataFlex version, piMinSize and piMaxSize are also adjusted accordingly. So the problem shouldn’t occur while migrating existing views and dialogs, but it’s important to understand this relationship between Size, piMinSize, and piMaxSize.
Client Area Sizing and Subclasses
When migrating existing workspaces to the latest DataFlex version, your views and dialogs can automatically be converted to use client area sizing. The migration wizard will automatically recognize your view and dialog subclasses during this process, so that views and dialogs based on those subclasses are also converted.
However, in some cases, if you have special logic in the subclasses dealing with view and dialog sizing, you may have to revise that logic so that it will work correctly with client area sizing. This should be very rare as most views and dialogs specify the size within the object, and not in the class. But if you have such special logic in your subclasses, it should be easy to revise after migration, and we still recommend migrating to client area sizing first, and then revising the special logic in the subclasses afterward.
Read More About It...
The Client Area Size Interface